All posts about light meters.

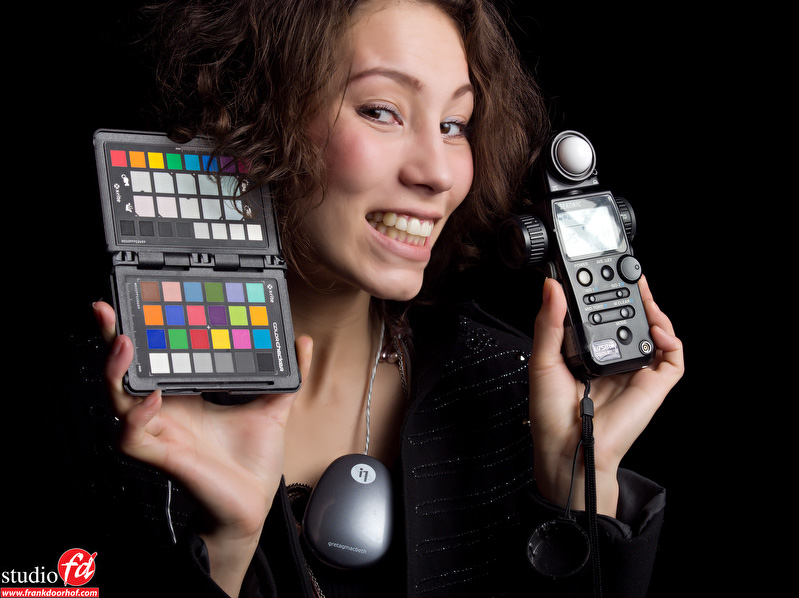
A topic on the light meter

I recently put a topic on social media and got so many good responses that I thought it also needed a place on the blog. Now let me make one thing 100% clear before starting this topic.  The light-meter is a tool, it’s nothing less and nothing more. If you don’t use a light-meter you’re not a bad person, you are without any doubt not a lesser photographer than someone who is using it, I think that from all “photographers” out there now a days less than 1% is using a light meter, from the pros this percentage will be a little bit higher and as you know those people can create stunning images.

I for one however strongly believe that someone that is into photography should at least look at the light meter to see what it does and how it operates, because if you use one, one thing is for sure it WILL speed up your workflow considerably and also helps you to create the same quality of exposure over and over again.


Now in the past I’ve written a lot on the subject and I still believe that there are areas that I did not touch (so who knows what you will see more in the future), during my workshops and talks to photographers I find that the group using a meter is very very small, when I talk about the reasons I often get the same responses “You don’t need it with digital right?” and that’s ok, with digital you can indeed judge an image on the “instant polaroid” on the back of your camera or on your screen. However I also get responses like “I use the histogram”, “I always thought meters were only for the landscape guys”, “I was told that the meter was inaccurate and that with digital you could nail the exposure so much better”…..


I’m not sponsored by Sekonic (and trust me I tried :D) but somehow the whole light meter thing did got me thinking and I decided a few years ago during PSW to do a class on why I use a meter with stunning results (I believe they sold out the meters in a few hours) ever since it’s been a solid part of what I teach.

Read more

The BIG white one

I’ve talked about this technique before on the blog, but today a few more images shot with this technique (just because it’s a cool technique).


How to set it up?
The setup is really simple and everyone can do it at home or in their studio.
Find a large white wall (and if you want to shoot full body you also need a white floor, for example white seamless), add two (or one) strobe aimed towards the background and make sure the model is not hit by the light from these strobes.


Start on full power and meter towards the front of the model, in this case probably towards the camera.
The value you see on your light meter is the value you put into your camera and the base is there, the image you will get will often be nice but if you add maybe between 1-2 stops extra (open up the aperture) you are into the creative zone 😀


The next images are shot with 1 stop extra (metering for example F8 and shooting on F5.6).
BTW there are a lot of questions about “where to aim the light meter”, normally you will hear me tell you to meter towards the light source, and don’t worry that’s still true of course. However you have to realize the way the meter works. It will actually meter the light hitting the subject on the area you want correct. In this case that’s the front of the model, so we point the meter forward. In most setups in the studio you will place your light in such a position that it hits the part of the model you want to be rendered correctly so you point towards the light source. So don’t worry, I’m not telling you to meter towards the camera all of a sudden 😀


Nadine Februari 14 Eersel (72 of 99)-Edit

Read more

Blowing out

We all know the white backgrounds, but to be honest I think they have had their longest time.
Now a days for example I just love the light grey backgrounds a lot more… we still use a white background for this but we just don’t light it, creating a very nice modern look. However if you still want to play with white why not try the following.


Normally we meter the model incident and add 2.5-3 stops to the background (metered reflective) to create a really nice white background without blowing out details like hair.
In the following shots I did something else, and I really like this technique. Instead of using a strobe as main light I just use the strobes on the white background and meter towards the camera (incident) to get a “correct” exposure on the face of the model. The main light source in this case is in fact the whole studio, or in other words all the light that scattered around the studio and reaches the model from the front. This will result in a very blown out background really wrapping around our model as you can see here :

Manon November 22 2013-92-EditNow if the effect is a bit too strong you can always lower the exposure a bit on the the model or move the model further away from the background.


This technique also works very nice for portraits, but watch out with models with really light blond hair 🙂

Read more

2 interesting guestblog links

Today 2 links to guestblogs I recently did for PhotoWhoa and Sekonic.


You can find the PhotoWhoa one here.


You can find the Sekonic one here.Â